Custom Block Shape API
This API allows you to change the shape of a reporter block to whatever you wish. It can be used for clarifying custom types and making blocks for certain data-types!
You should have a decent knowledge of ScratchBlocks and SVG Paths to use this API.
Note that the name ScratchBlocks is mentioned, but ScratchBlocks is simply a custom modification of Blockly so that name also appears in some functions.
Making the shape
This tutorial uses SvgPathEditor since it's the path editor we used to make the new shapes seen in PenguinMod.
Base path
The easiest way to make your shapes is to start with an existing shape's path. You can easily get one of these by pasting one of these into the DevTools Console in your browser:
ScratchBlocks.BlockSvg.INPUT_SHAPE_HEXAGONALScratchBlocks.BlockSvg.INPUT_SHAPE_LEAFScratchBlocks.BlockSvg.INPUT_SHAPE_PLUSScratchBlocks.BlockSvg.INPUT_SHAPE_ROUND
To copy the path, you just need to press enter (to get the output of the variable) and then right-click the output string and click "Copy string contents."
If you want to use the Square shape, it's actually recommended to use the path below since the one in BlockSvg is reused for non-reporters, and is thus built differently.
M 16 0 h 16 h 12 a 4 4 0 0 1 4 4 l 0 24 a 4 4 0 0 1 -4 4 h -12 h -16 h -12 a 4 4 0 0 1 -4 -4 l 0 -24 a 4 4 0 0 1 4 -4 z
See the notes in each section if you don't want to use a base path.
Importing the Base path
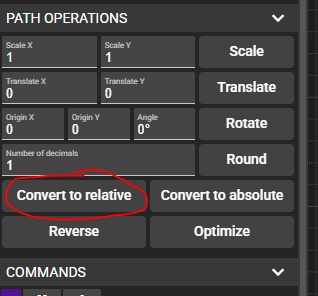
In SvgPathEditor you now want to paste the base path in the top left, and click "Convert to absolute" in the menu.
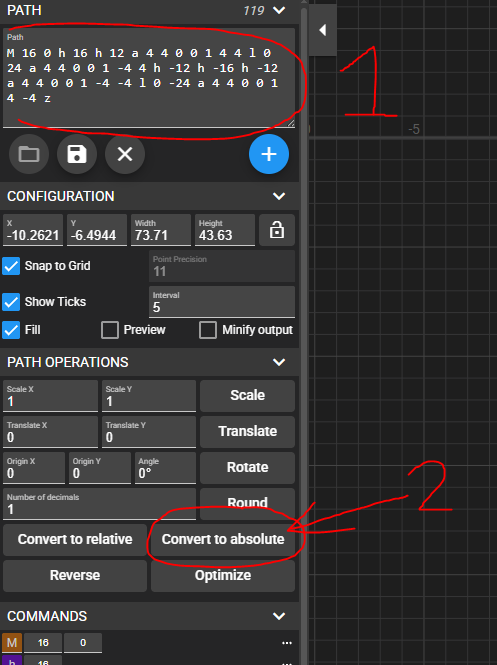
This is the easiest way to design the path since you won't be moving other parts of the path as much if they were kept relative.
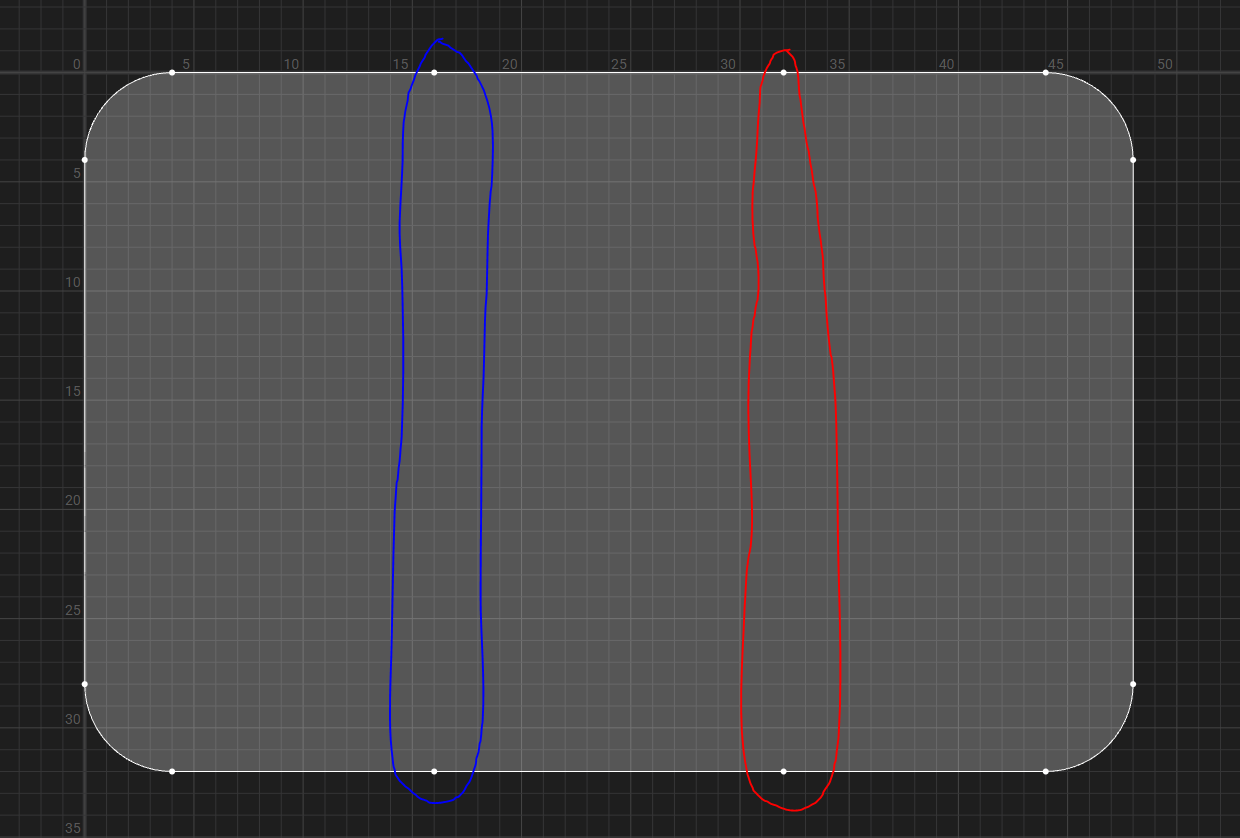
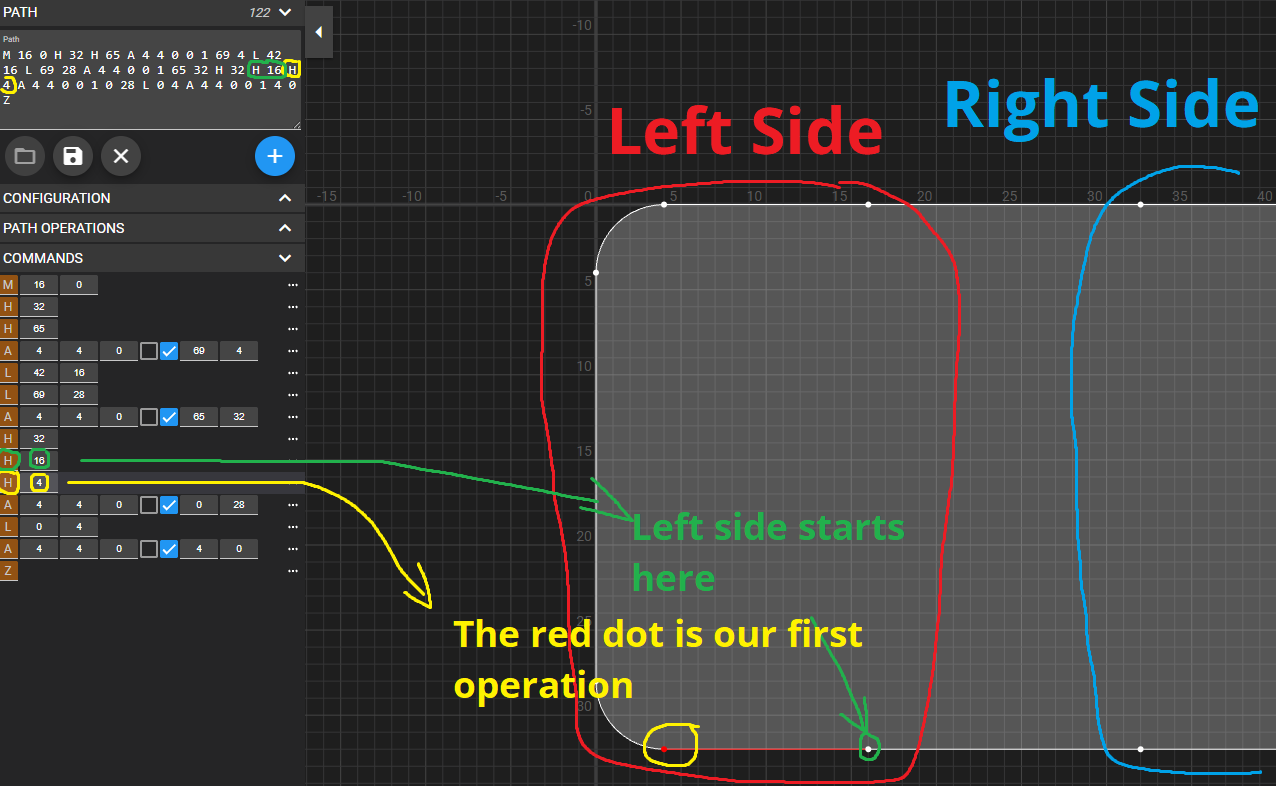
Some of the base paths have some padding before the left-side and right-side of the shape, and others don't.
To find the right-side and left-side of the shape, basically just find where 2 dots align on the Y-axis for either side and edit the parts past the dots.
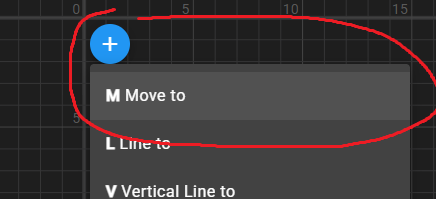
If you don't want to use a base path, simply hover your mouse into the main canvas and add a "Move to" command.
Then, set this location to the start of the right-side of the shape. Keep it at 0 on the Y-axis, and positive in the X-axis. Leave a lot of room on the left of your movement for the left-side of your shape, but make sure it looks right since this path also determines how the empty argument hole looks for this shape.
Making the right-side of your shape
Note that the right-side of the shape is actually drawn before the left-side. Messing up how this side is placed will likely mess up how your left-side is placed.
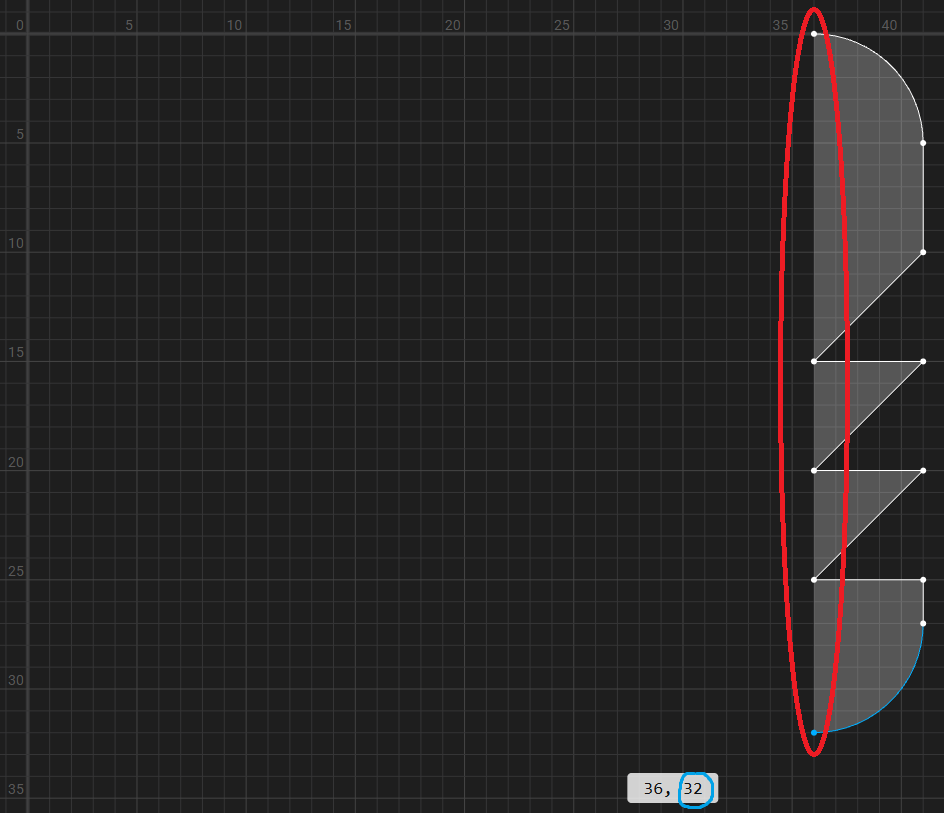
Edit your base path as much as you want, but make sure when you are done that you didn't change the height of the shape or move the Y position of either of the 2 dots you found earlier.
The shape should always have a height of 32 units (or at least really close to it.) The lowest points in the shape should have their Y position at 32.
Also make sure you don't make any extra holes deeper than the right-side of the shape starts. If you want to make deep holes then you need to move the entire right-side either by adding horizontal lines after and before the 2 aligned dots respectively, or moving elements after the 2 dots.
If you don't want to use a base path, make sure you end the right-side of the shape at 32 units on the Y-axis and on the same X position you started the right-side on.
You then need to make a horizontal line left, to move the pointer to the start of the left-side.
Make sure you don't let the shape go past the center Y-axis line or the empty argument hole will clip into text on the block that uses it. You can use the "Convert to relative" button to move the entire left-side from this point if it does end up going past the Y-axis line later.
Making the left-side of your shape
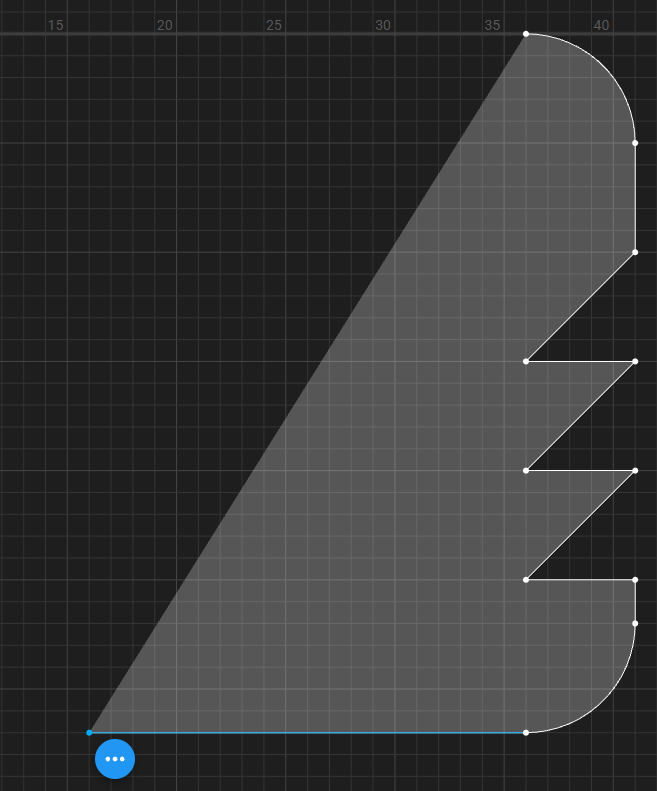
This is basically the same process as the right-side, just note that the left-side starts at the bottom left.
For the left-side, the highest points in the shape should have their Y position at 0.
If you don't want to use a base path, make sure you add a "Close Path" command when you are done.
Final setup
Click the "Convert to relative" option and move things around if they are no longer in-bounds (the height of the shape isn't 32 units or the shape extends beyond one of the axis lines.)
Defining the shape
In order to make custom block shapes, you first need to grab ScratchBlocks itself:
/* get ScratchBlocks if availiable... */
if (Scratch.gui) {
    Scratch.gui.getBlockly().then(ScratchBlocks => {
        // here you have access to ScratchBlocks safely
    });
}
Make sure you don't try to grab ScratchBlocks without checking for the GUI, since packaged projects will not have ScratchBlocks present.
You then need to use the ScratchBlocks.BlockSvg.registerCustomShape function inside the then callback to register your shape:
Scratch.gui.getBlockly().then(ScratchBlocks => {
    ScratchBlocks.BlockSvg.registerCustomShape("[EXTENSION ID]-[SHAPE NAME]", shape);
});
The first argument to registerCustomShape is the ID of your shape. This must be set to your extension's ID, then your shape's name, with a dash between.
An example would be myReallyCoolExtension-triangleCut. The extension ID is myReallyCoolExtension and the shape is a triangleCut.
Next, you need to provide an object specifying your shape's details.
Entering your shape's details
The shape parameter in registerCustomShape is an object, containing the following properties:
emptyInputPath
{
    emptyInputPath: "",
}
Set emptyInputPath to the entire path you just made. This can be found in the top-left of SvgPathEditor, same place where you pasted the base path at first.
Example:
{
    emptyInputPath: "m 16 0 h 16 h 33 a 4 4 0 0 1 4 4 l -27 12 l 27 12 a 4 4 0 0 1 -4 4 h -33 h -16 h -12 a 4 4 0 0 1 -4 -4 l 0 -24 a 4 4 0 0 1 4 -4 z",
}
emptyInputWidth (optional)
This property is optional.
This determines how wide your emptyInputPath is. The default value for this property (if not provided) is 12 * ScratchBlocks.BlockSvg.GRID_UNIT.
For this example shape, we will use 19 * ScratchBlocks.BlockSvg.GRID_UNIT.
leftPath
{
    emptyInputPath: "(path)",
    emptyInputWidth: 19 * ScratchBlocks.BlockSvg.GRID_UNIT,
    leftPath: (block) => {
        return [];
    },
}
leftPath is a function that constructs the left-side of your SVG path. To fill this out, do the following:
Copy this template:
To start the leftPath, use this template:
leftPath: (block) => {
    const edgeWidth = block.height / 2;
    const s = edgeWidth / 16;
    return [];
},
block.height is the height of the block. We divide this by 2 to match with the value used in rightPath because it makes the math easier.
Using block.height in leftPath also allows this block shape to work properly when it is given a branch input.
The s variable should now scale to 1 unit in the path you just made.
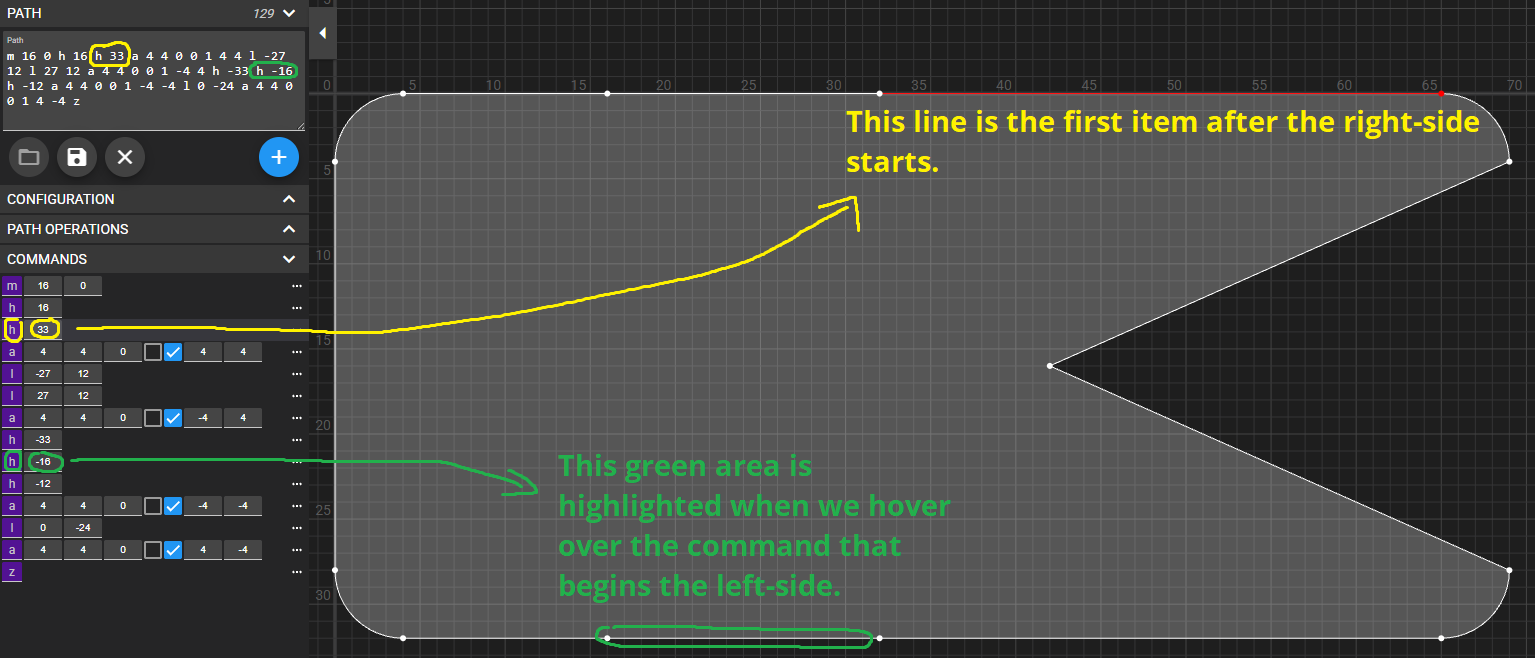
Find the first command after the left-side of the shape starts.
The left-side is (some-what confusingly) at the end of your shape's path, and it's a little complicated to find the commands here.
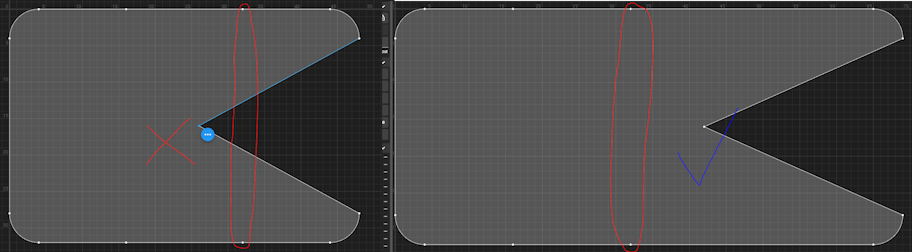
Hover over each command in the COMMANDS list in the editor, until you see the first item added after the left-side starts. The dot for this item should turn red, aswell as the line behind it.
You then want to find the actual command in the output path. It's easiest to look for the letter and then see if the number matches, then see if the previous commands match like that aswell.
In this diagram, the first item after the left-side starts has it's command circled yellow. The left-side starting dot is also colored green.
Ignore this diagram using absolute commands, make sure the path is relative now.
Once you find the command in the output path, copy the command and everything after it into the return []; section like so:
leftPath: (block) => {
    const edgeWidth = block.height / 2;
    const s = edgeWidth / 16;
    return [`h -12 a 4 4 0 0 1 -4 -4 l 0 -24 a 4 4 0 0 1 4 -4 z`];
},
Then, remove the ending z command and it's space beforehand.
leftPath: (block) => {
    const edgeWidth = block.height / 2;
    const s = edgeWidth / 16;
    return [`h -12 a 4 4 0 0 1 -4 -4 l 0 -24 a 4 4 0 0 1 4 -4`];
},
Make the shape scale properly
Replace all of the numbers in the commands you just copied, and make them multiplied by s.
Note that some numbers in certain commands (like arcs) are actually flags to do something else (like the arc's sweep flag) so you shouldn't multiply these.
You can tell where your commands have a flag by either looking at the commands in SvgPathEditor and seeing where the checkboxes line up with the actual command, or by ticking the checkboxes in your commands in SvgPathEditor and seeing where values change between 0 and 1.
leftPath: (block) => {
    const edgeWidth = block.height / 2;
    const s = edgeWidth / 16;
    return [`h ${-12 * s} a ${4 * s} ${4 * s} ${0 * s} 0 1 ${-4 * s} ${-4 * s} l ${0 * s} ${-24 * s} a ${4 * s} ${4 * s} ${0 * s} 0 1 ${4 * s} ${-4 * s}`];
},
(Optionally) make parts of the shape not scale
Our example shape has rounded corners that shouldn't scale with the entire block when it changes size.
This shape's corners are 4 units in width and height, so we need to make it's corners not use the s variable:
leftPath: (block) => {
    const edgeWidth = block.height / 2;
    const s = edgeWidth / 16;
    return [`h ${-12 * s} a 4 4 0 0 1 -4 -4 l ${0 * s} ${-24 * s} a 4 4 0 0 1 4 -4`];
},
and make the center line between the 2 corners double the block's height, but remove 8 units (for the 2 corners):
leftPath: (block) => {
    const edgeWidth = block.height / 2;
    const s = edgeWidth / 16;
    const height = edgeWidth * 2;
    return [`h ${-12 * s} a 4 4 0 0 1 -4 -4 l ${0 * s} ${-(height - 8)} a 4 4 0 0 1 4 -4`];
},
Still using edgeWidth so height is the same value in rightPath.
Example (with leftPath and rightPath set)

rightPath
{
    emptyInputPath: "(path)",
    emptyInputWidth: 19 * ScratchBlocks.BlockSvg.GRID_UNIT,
    leftPath: (block) => {
        const edgeWidth = block.height / 2;
        const s = edgeWidth / 16;
        const height = edgeWidth * 2;
        return [`h ${-12 * s} a 4 4 0 0 1 -4 -4 l ${0 * s} ${-(height - 8)} a 4 4 0 0 1 4 -4`];
    },
    rightPath: (block) => {
        return [];
    },
}
rightPath is a function that constructs the right-side of your SVG path. The process is essentially the same as leftPath after the beginning few steps.
To fill this out, do the following:
Copy this template:
To start the rightPath, use this template:
rightPath: (block) => {
    const edgeWidth = block.edgeShapeWidth_;
    const s = edgeWidth / 16;
    return [];
},
block.edgeShapeWidth_ is half of the width of the edge of the block. Essentially, this is half of the height of the block.
Unlike leftPath, we actually don't have access to the block.height variable in rightPath yet. The block's height is calculated after the rightPath is drawn, since the rightPath is actually drawn before the leftPath. This means we need to use block.edgeShapeWidth_ as the best guess for the block's height for now.
The s variable should now scale to 1 unit in the path you just made.
Find the first command after the right-side of the shape starts.
The right-side starts very early into the path, so it should be simple to find the first command after it starts.
Hover over each command in the COMMANDS list in the editor, until you see the first item added after the right-side starts. The dot for this item should turn red, aswell as the line behind it.
You then want to copy every command up until before the command that starts the left-side. This is the command we skipped in the left-side, and we also skip it here.
rightPath: (block) => {
    const edgeWidth = block.edgeShapeWidth_;
    const s = edgeWidth / 16;
    return [`h 33 a 4 4 0 0 1 4 4 l -27 12 l 27 12 a 4 4 0 0 1 -4 4 h -33`];
},
Unlike leftPath, we don't need to remove anything extra from this.
Apply the "Make the shape scale properly" step from leftPath
Now you can handle this section the same as the other steps previously mentioned in leftPath.
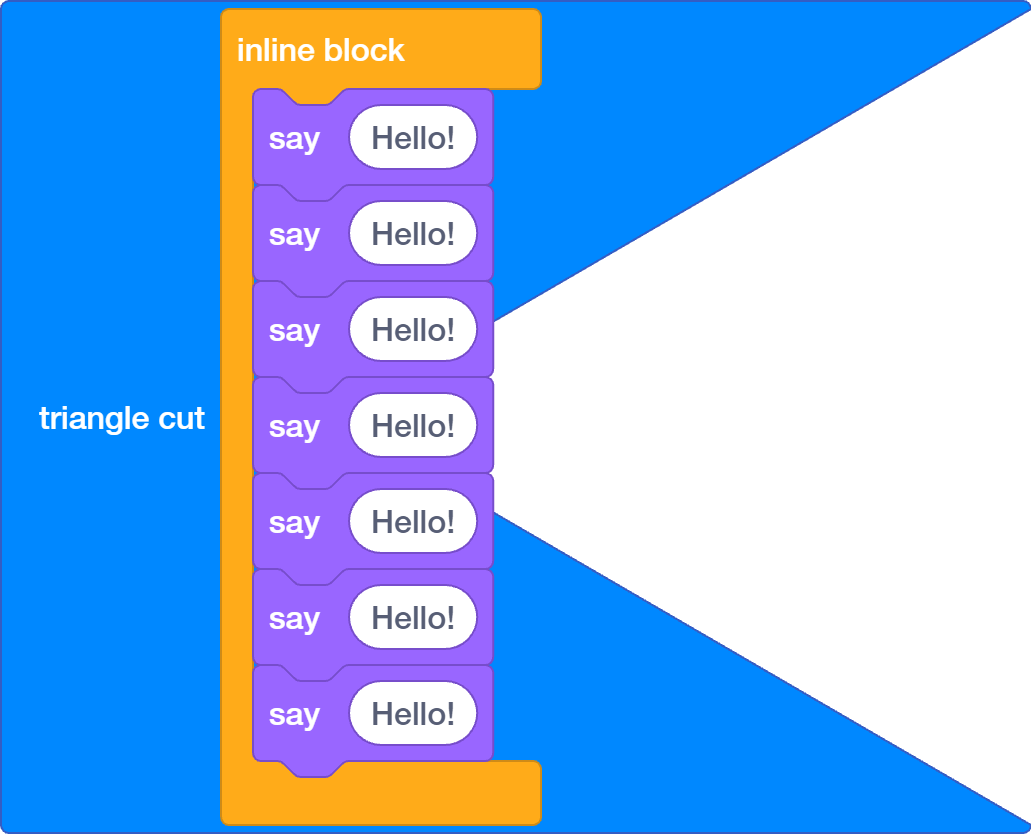
This shape also needs the "(Optionally) make parts of the shape not scale" step since the right-side also contains some corners.
In this case, our shape has a large cut hole on the right-side made of 2 lines about half the height of the edge. We can apply this like so:
rightPath: (block) => {
    const edgeWidth = block.edgeShapeWidth_;
    const s = edgeWidth / 16;
    const height = edgeWidth * 2;
    return [`h ${33 * s} a 4 4 0 0 1 4 4 l ${-27 * s} ${(height / 2) - 4} l ${27 * s} ${(height / 2) - 4} a 4 4 0 0 1 -4 4 h ${-33 * s}`];
},
Example (with leftPath and rightPath set)
blockPadding (optional)
This property is optional.
{
    emptyInputPath: "(path)",
    emptyInputWidth: 19 * ScratchBlocks.BlockSvg.GRID_UNIT,
    leftPath: (block) => {
        const edgeWidth = block.height / 2;
        const s = edgeWidth / 16;
        const height = edgeWidth * 2;
        return [`h ${-12 * s} a 4 4 0 0 1 -4 -4 l ${0 * s} ${-(height - 8)} a 4 4 0 0 1 4 -4`];
    },
    rightPath: (block) => {
        const edgeWidth = block.edgeShapeWidth_;
        const s = edgeWidth / 16;
        const height = edgeWidth * 2;
        return [`h ${33 * s} a 4 4 0 0 1 4 4 l ${-27 * s} ${(height / 2) - 4} l ${27 * s} ${(height / 2) - 4} a 4 4 0 0 1 -4 4 h ${-33 * s}`];
    },
    blockPadding: {
        internal: {},
        external: {},
    },
}
blockPadding is an object that applies padding based on if this block is inside a specific type of block, or if a specific type of block is within this block.
This object also needs to have an internal property and an external property, both being objects.
You mostly need to play around with this value until it "feels right" for your shape, since you might want your shape to look a certain way in another block or be padded a certain way when it has one type of block in it.
internal
This object defines padding added to this block shape when the specified block shape is put inside of it.
Using the number 0 here refers to a Field. This is not usable in the external property since blocks cannot be put into Fields.
Example:
{
    internal: {
        0: 5 * ScratchBlocks.BlockSvg.GRID_UNIT, // Field in custom shape.
        [ScratchBlocks.OUTPUT_SHAPE_HEXAGONAL]: 2 * ScratchBlocks.BlockSvg.GRID_UNIT, // Hexagon in custom shape.
    }
}
You can also use the literal value of OUTPUT_SHAPE enums since they are not intended to change:
{
    internal: {
        0: 5 * ScratchBlocks.BlockSvg.GRID_UNIT, // Field in custom shape.
        1: 2 * ScratchBlocks.BlockSvg.GRID_UNIT, // Hexagon in custom shape.
    }
}
external
This object defines padding added to the specified block shapes when this block shape is inside of them.
Example:
{
    external: {
        [ScratchBlocks.OUTPUT_SHAPE_HEXAGONAL]: 2 * ScratchBlocks.BlockSvg.GRID_UNIT, // Custom shape in hexagon.
    }
}
You can also use the literal value of OUTPUT_SHAPE enums since they are not intended to change:
{
    external: {
        1: 2 * ScratchBlocks.BlockSvg.GRID_UNIT, // Custom shape in hexagon.
    }
}
Example
This example makes the padding extreme to make it obvious:
{
    blockPadding: {
        internal: {
            1: 25 * ScratchBlocks.BlockSvg.GRID_UNIT, // Hexagon in custom shape.
        },
        external: {
            1: 50 * ScratchBlocks.BlockSvg.GRID_UNIT, // Custom shape in hexagon.
        },
    },
}
Normal shape:
Internal padding:

External padding:

See more
The default padding values for each shape can be seen in code here.
blockPaddingStart (optional)
This property is optional.
{
    emptyInputPath: "(path)",
    emptyInputWidth: 19 * ScratchBlocks.BlockSvg.GRID_UNIT,
    leftPath: (block) => {
        const edgeWidth = block.height / 2;
        const s = edgeWidth / 16;
        const height = edgeWidth * 2;
        return [`h ${-12 * s} a 4 4 0 0 1 -4 -4 l ${0 * s} ${-(height - 8)} a 4 4 0 0 1 4 -4`];
    },
    rightPath: (block) => {
        const edgeWidth = block.edgeShapeWidth_;
        const s = edgeWidth / 16;
        const height = edgeWidth * 2;
        return [`h ${33 * s} a 4 4 0 0 1 4 4 l ${-27 * s} ${(height / 2) - 4} l ${27 * s} ${(height / 2) - 4} a 4 4 0 0 1 -4 4 h ${-33 * s}`];
    },
    blockPadding: {
        internal: {
            1: 25 * ScratchBlocks.BlockSvg.GRID_UNIT, // Hexagon in custom shape.
        },
        external: {
            1: 50 * ScratchBlocks.BlockSvg.GRID_UNIT, // Custom shape in hexagon.
        },
    },
    blockPaddingStart: (block, otherShape, firstInput, firstField, row) => {
        return 0;
    },
}
The blockPaddingStart property is a function that returns a numerical amount of padding to add to the block.
This can be useful if you have parts of your shape that need to be extremely padded when the block is taller, like the Boolean shape.
You mostly need to play around with this value until it "feels right" for your shape, since you might want your shape to look a certain way in another block or be padded a certain way when it has one type of block in it.
Below is a reimplementation of the Boolean shapes' settings:
blockPaddingStart: (block, otherShape, firstInput, firstField, row) => {
    return Math.max(((firstInput.renderHeight - ScratchBlocks.BlockSvg.MIN_BLOCK_Y_REPORTER)) / 2, 0);
},
And here is what we will use for our block:
blockPaddingStart: (block, otherShape, firstInput, firstField, row) => {
    return Math.max(((firstInput.renderHeight - ScratchBlocks.BlockSvg.MIN_BLOCK_Y_REPORTER)) / 8, 0);
},
We can use less of the firstInput's renderHeight since there's not actually anything on the left side of the shape, we just need to pad the left-side a bit so it doesn't start to clip into the block's text.
There are unused inputs in the function, and that's just if you find some way to use them in a useful way. You can usually just modify the formula the Boolean shape uses to get the padding you want.
blockPaddingEnd (optional)
This property is optional.
{
    emptyInputPath: "(path)",
    emptyInputWidth: 19 * ScratchBlocks.BlockSvg.GRID_UNIT,
    leftPath: (block) => {
        const edgeWidth = block.height / 2;
        const s = edgeWidth / 16;
        const height = edgeWidth * 2;
        return [`h ${-12 * s} a 4 4 0 0 1 -4 -4 l ${0 * s} ${-(height - 8)} a 4 4 0 0 1 4 -4`];
    },
    rightPath: (block) => {
        const edgeWidth = block.edgeShapeWidth_;
        const s = edgeWidth / 16;
        const height = edgeWidth * 2;
        return [`h ${33 * s} a 4 4 0 0 1 4 4 l ${-27 * s} ${(height / 2) - 4} l ${27 * s} ${(height / 2) - 4} a 4 4 0 0 1 -4 4 h ${-33 * s}`];
    },
    blockPadding: {
        internal: {
            1: 25 * ScratchBlocks.BlockSvg.GRID_UNIT, // Hexagon in custom shape.
        },
        external: {
            1: 50 * ScratchBlocks.BlockSvg.GRID_UNIT, // Custom shape in hexagon.
        },
    },
    blockPaddingStart: (block, otherShape, firstInput, firstField, row) => {
        return Math.max(((firstInput.renderHeight - ScratchBlocks.BlockSvg.MIN_BLOCK_Y_REPORTER)) / 8, 0);
    },
    blockPaddingEnd: (block, otherShape, lastInput, lastField, row) => {
        return 0;
    },
}
Copy of blockPaddingStart, but the padding is applied to the right-side of the block.
Below is a reimplementation of the Boolean shapes' settings which we will use for our block:
blockPaddingEnd: (block, otherShape, lastInput, lastField, row) => {
    return Math.max(((lastInput.renderHeight - ScratchBlocks.BlockSvg.MIN_BLOCK_Y_REPORTER)) / 2, 0);
},
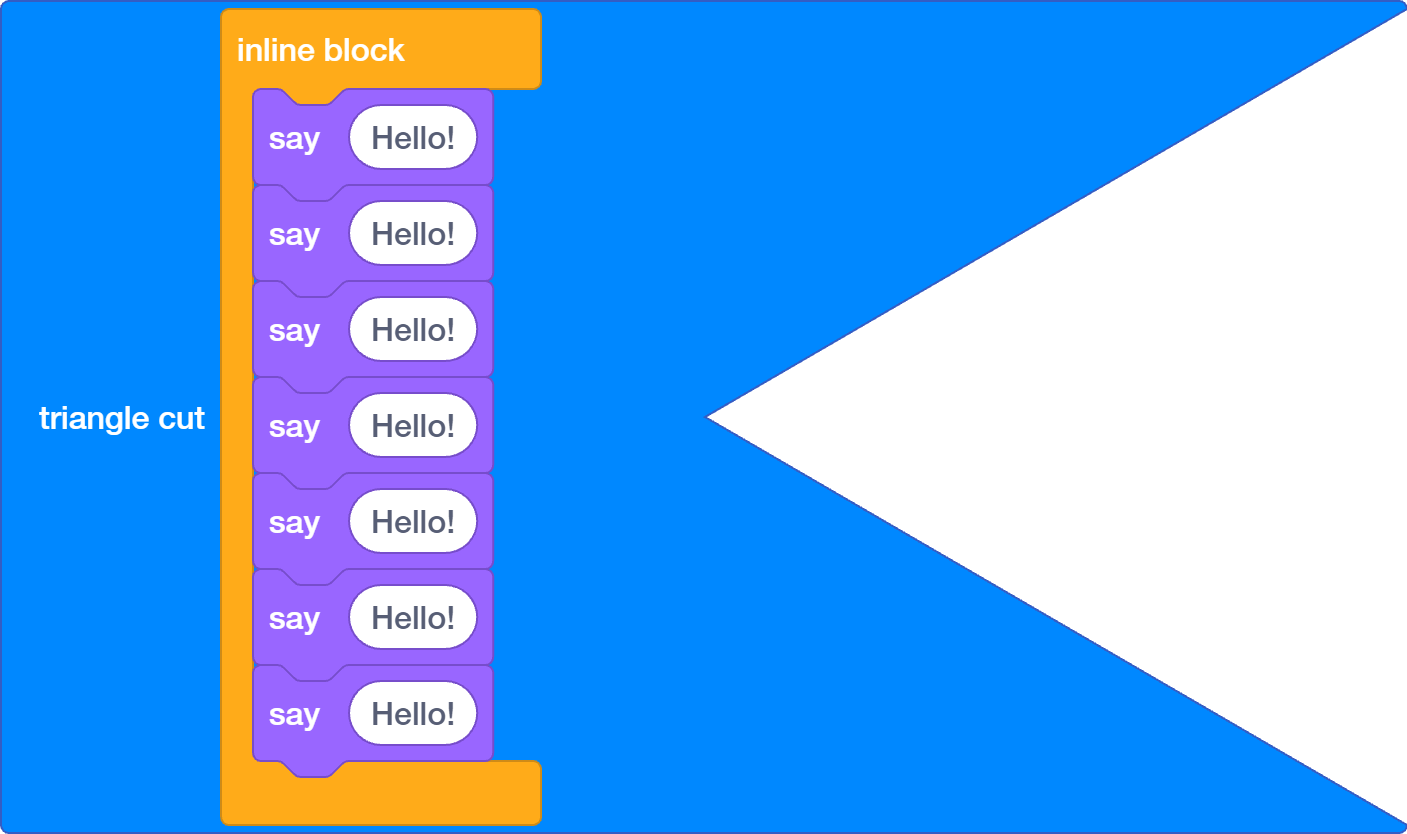
Example Block Shape
Implementing all of the above properties, we get this shape:
{
    emptyInputPath: "m 16 0 h 16 h 33 a 4 4 0 0 1 4 4 l -27 12 l 27 12 a 4 4 0 0 1 -4 4 h -33 h -16 h -12 a 4 4 0 0 1 -4 -4 l 0 -24 a 4 4 0 0 1 4 -4 z",
    emptyInputWidth: 19 * ScratchBlocks.BlockSvg.GRID_UNIT,
    leftPath: (block) => {
        const edgeWidth = block.height / 2;
        const s = edgeWidth / 16;
        const height = edgeWidth * 2;
        return [`h ${-12 * s} a 4 4 0 0 1 -4 -4 l ${0 * s} ${-(height - 8)} a 4 4 0 0 1 4 -4`];
    },
    rightPath: (block) => {
        const edgeWidth = block.edgeShapeWidth_;
        const s = edgeWidth / 16;
        const height = edgeWidth * 2;
        return [`h ${33 * s} a 4 4 0 0 1 4 4 l ${-27 * s} ${(height / 2) - 4} l ${27 * s} ${(height / 2) - 4} a 4 4 0 0 1 -4 4 h ${-33 * s}`];
    },
    blockPadding: {
        internal: {
            1: 25 * ScratchBlocks.BlockSvg.GRID_UNIT, // Hexagon in custom shape.
        },
        external: {
            1: 50 * ScratchBlocks.BlockSvg.GRID_UNIT, // Custom shape in hexagon.
        },
    },
    blockPaddingStart: (block, otherShape, firstInput, firstField, row) => {
        return Math.max(((firstInput.renderHeight - ScratchBlocks.BlockSvg.MIN_BLOCK_Y_REPORTER)) / 8, 0);
    },
    blockPaddingEnd: (block, otherShape, lastInput, lastField, row) => {
        return Math.max(((lastInput.renderHeight - ScratchBlocks.BlockSvg.MIN_BLOCK_Y_REPORTER)) / 2, 0);
    },
}
Using a Custom Shape in your Extension
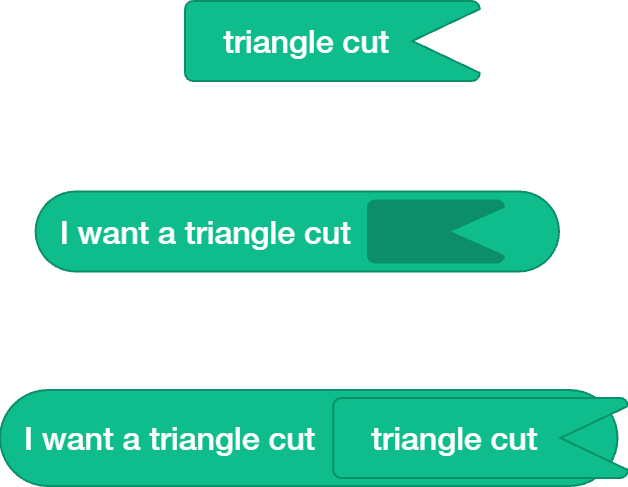
Now that your shape is registered (with no errors), you can safely use the shape in your extension.
Make an output block
In your extension's category, make a basic block:
blocks: [
    {
        opcode: 'triangleCutShape',
        text: 'triangle cut',
        blockType: Scratch.BlockType.REPORTER,
    },
]
To give it our custom shape, we need to add the blockShape parameter:
{
    opcode: 'triangleCutShape',
    text: 'triangle cut',
    blockType: Scratch.BlockType.REPORTER,
    blockShape: "myReallyCoolExtension-triangleCut",
},

forceOutputType (optional)
If you only want this block to fit into other block's arguments using the same shape, then you need to add the forceOutputType parameter:
{
    opcode: 'triangleCutShape',
    text: 'triangle cut',
    blockType: Scratch.BlockType.REPORTER,
    blockShape: "myReallyCoolExtension-triangleCut",
    forceOutputType: "myReallyCoolExtension-triangleCut",
},
You also need the input block to add the check parameter into it's argument.
Make an input block
In your extension's category, make a basic block with an argument:
{
    opcode: 'triangleCutWanted',
    text: 'I want a triangle cut [TRIANGLECUT]',
    blockType: Scratch.BlockType.REPORTER,
    arguments: {
        TRIANGLECUT: {
            // ???
        }
    }
},
Then, add the shape property to specify the shape that the argument should take:
{
    opcode: 'triangleCutWanted',
    text: 'I want a triangle cut [TRIANGLECUT]',
    blockType: Scratch.BlockType.REPORTER,
    arguments: {
        TRIANGLECUT: {
            shape: "myReallyCoolExtension-triangleCut",
        }
    }
},

If you added forceOutputType to the output block from earlier, you also need to specify the check property:
{
    opcode: 'triangleCutWanted',
    text: 'I want a triangle cut [TRIANGLECUT]',
    blockType: Scratch.BlockType.REPORTER,
    arguments: {
        TRIANGLECUT: {
            shape: "myReallyCoolExtension-triangleCut",
            check: "myReallyCoolExtension-triangleCut",
        }
    }
},

Example Block Extension Code
Here's the full code example for our block from earlier:
(function(Scratch) {
    'use strict';

    /* get ScratchBlocks if availiable... */
    if (Scratch.gui) {
        Scratch.gui.getBlockly().then(ScratchBlocks => {
            // here you have access to ScratchBlocks safely
            ScratchBlocks.BlockSvg.registerCustomShape("myReallyCoolExtension-triangleCut", {
                emptyInputPath: "m 16 0 h 16 h 33 a 4 4 0 0 1 4 4 l -27 12 l 27 12 a 4 4 0 0 1 -4 4 h -33 h -16 h -12 a 4 4 0 0 1 -4 -4 l 0 -24 a 4 4 0 0 1 4 -4 z",
                emptyInputWidth: 19 * ScratchBlocks.BlockSvg.GRID_UNIT,
                leftPath: (block) => {
                    const edgeWidth = block.height / 2;
                    const s = edgeWidth / 16;
                    const height = edgeWidth * 2;
                    return [`h ${-12 * s} a 4 4 0 0 1 -4 -4 l ${0 * s} ${-(height - 8)} a 4 4 0 0 1 4 -4`];
                },
                rightPath: (block) => {
                    const edgeWidth = block.edgeShapeWidth_;
                    const s = edgeWidth / 16;
                    const height = edgeWidth * 2;
                    return [`h ${33 * s} a 4 4 0 0 1 4 4 l ${-27 * s} ${(height / 2) - 4} l ${27 * s} ${(height / 2) - 4} a 4 4 0 0 1 -4 4 h ${-33 * s}`];
                },
                blockPadding: {
                    internal: {
                        1: 25 * ScratchBlocks.BlockSvg.GRID_UNIT, // Hexagon in custom shape.
                    },
                    external: {
                        1: 50 * ScratchBlocks.BlockSvg.GRID_UNIT, // Custom shape in hexagon.
                    },
                },
                blockPaddingStart: (block, otherShape, firstInput, firstField, row) => {
                    return Math.max(((firstInput.renderHeight - ScratchBlocks.BlockSvg.MIN_BLOCK_Y_REPORTER)) / 8, 0);
                },
                blockPaddingEnd: (block, otherShape, lastInput, lastField, row) => {
                    return Math.max(((lastInput.renderHeight - ScratchBlocks.BlockSvg.MIN_BLOCK_Y_REPORTER)) / 2, 0);
                },
            });
        });
    }

    class MyReallyCoolExtension {
        getInfo() {
            return {
                id: 'myReallyCoolExtension',
                name: 'My Really Cool Extension',
                blocks: [
                    {
                        opcode: 'triangleCutShape',
                        text: 'triangle cut',
                        blockType: Scratch.BlockType.REPORTER,
                        blockShape: "myReallyCoolExtension-triangleCut",
                        forceOutputType: "myReallyCoolExtension-triangleCut",
                    },
                    {
                        opcode: 'triangleCutWanted',
                        text: 'I want a triangle cut [TRIANGLECUT]',
                        blockType: Scratch.BlockType.REPORTER,
                        arguments: {
                            TRIANGLECUT: {
                                shape: "myReallyCoolExtension-triangleCut",
                                check: "myReallyCoolExtension-triangleCut",
                            }
                        }
                    },
                ]
            }
        }
    }

    Scratch.extensions.register(new MyReallyCoolExtension());
})(Scratch);